ConEmu – split setup for Node.js
Posted by codereflection in Development, Productivity on April 16, 2014
I’m a big fan of ConEmu. I’ve recently starting making use of the split console capability, as shown below

Getting the split screen is easy, you just have to select the option in the new console window dialog
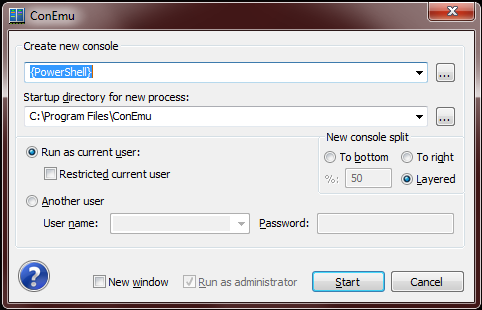
Here’s the triple split that I typically use for Node.js development:

What I really want though is my split screen setup in one easy step. Fortunately that’s possible with little effort through some additional commands in ConEmu’s Tasks option. What I did was created a new task called Node.js with the following options:

Explanation:
- Node.js – this is just the task name
- Commands
- The > before powershell.exe means that I want this console to be the active one when I start the task
- powershell.exe is listed three times, delimited by empty lines, this means I want powershell to open 3 times
- The second powershell.exe has the option -cur_console:as30H, meaning that I want it to be a horizontal split at the size of 30%
- The third powershell.exe has the option -cur_console:as30V, meaning that I want it to be a vertical split at the size of 30%. Since this comes after the second command, it will be split under the second console, as shown in the screenshot above
- Additional option: -noexit -command “$host.UI.RawUI.WindowTitle=’NodeJS'” means that I want to set the title of the tab to NodeJS
Now I can get my triple split setup just by selecting the new task:

Hopefully this is useful to someone else. 🙂
Unable to search in Lync 2013
Posted by codereflection in Uncategorized on May 20, 2013
I recently started using Lync 2013, but with a couple of hacks to get it work with our Communicator 2007 server. While trying to apply various registry hacks to get things like Outlook 2013 integration to work, I somehow broke my capability to search for contacts in Lync.
The fix turned out to be just exiting Lync, deleting this registry key, and opening Lync again. Then voila, I can now search my contacts again.
HKEY_CURRENT_USER\Software\Microsoft\Communicator
Coding Fonts: Envy Code R, Consolas, and Adobe’s Source Code Pro in Visual Studio 2012
Posted by codereflection in Musings on October 4, 2012
Being a bit of a font geek (a little, not much), I am always on the lookout for a better coding font. As a long time user of Microsoft’s Consolas, and Damien Guard’s Envy Code R, I was excited to try out Adobe’s new entry, Source Code Pro. I always want to see a comparison between what I use and the new font in question. So here are the comparisons:

The first thing that I notice between Envy Code R and Source Code Pro is the difference in width. I have both of these dialed up to 11. Envy Code R is a little more subtle on distinguishing letters which can be commonly confused, such as 1 and l, O and 0, and so on. Even though I can fit more code on the screen with Envy Code R, it might be worth trying Source Code Pro for a while to see if it is generally easier to read.

(Source Code Pro on top, Envy Code R on the bottom)

Next we have Microsoft’s Consolas vs Adobe’s Source Code Pro. Again, more code fits onto the screen with Consolas over Source Code Pro; not only horizontally, but also vertically. I do like the sweeping bottoms of Source Code Pro’s lower case L and I over Consolas, which are conversely flat. Compared to Source Code Pro, Consolas just looks harsh. Of course it’s not nearly as harsh as something like Courier New, but in this comparison, it’s clearly not the winner.

(Source Code Pro on top, Consolas on the bottom)
I’m pretty much over using Consolas. It’s still a nice font, but when I start to focus in on the parts of it that I really don’t care for, those parts become difficult to ignore. Envy Code R is my font of choice, but I will give Source Code Pro at least a week of trial before giving it a final thumbs up or down.
Converting Brail View Engine pages on MonoRail to use the Spark View Engine
Posted by codereflection in Development on October 3, 2011
Converting from the Brail View Engine to the Spark View Engine for MonoRail apps might not be interesting to many people, but here it is nonetheless. (We’re having to convert a project over due to switching our dependency management to Nuget.. hence the old Brail View Engine does not like the newer Castle.Core.)
Tags:
Brail property bag shortcuts:
<head>
<title>${Title}</title>
</head>
Spark equivalent :
<head>
<title>${PropertyBag["Title"]}</title>
</head>
The only problem with this is it’s not as clean as the Brail version. However, there’s a solution. By using the
viewdata
tag, you can write the code just like Brail:
<viewdata SiteRoot='string' />
<head>
<title>${Title}</title>
</head>
Conditionals:
Brail:
<% if AppEnvironment.ToUpper() == "DEV": %>
<div>
V: <strong>${VersionNumber}</strong>
Environment: <strong>${AppEnvironment}</strong>
Connection: <strong>${ConnectionEnvironment}</strong>
<% if AreThereProblemsWithTheEnvironment: %>
<a href="${siteroot}/Admin/Health.rails">
<img src="${siteroot}/Images/sick.jpg" title="I'm not feeling so hot...there are some problems with the environment" />
</a>
<% end %>
</div>
<% end %>
Spark:
<if condition='PropertyBag["AppEnvironment"].ToString().ToUpper() == "DEV"'>
<div>
V: <strong>${PropertyBag["VersionNumber"]}</strong>
Environment: <strong>${PropertyBag["AppEnvironment"]}</strong>
Connection: <strong>${PropertyBag["ConnectionEnvironment"]}</strong>
<if condition='(int)PropertyBag["AreThereProblemsWithTheEnvironment"] > 0' >
<a href='${SiteRoot}/Admin/Health.spark'>
<img src="${SiteRoot}/Images/sick.jpg" title="I'm not feeling so hot...there are some problems with the environment" />
</a>
</if>
</div>
</if>
Looping:
Brail:
<div>
<%
addSlash = false
for breadCrumb in breadCrumbs:
output " > " if addSlash
%>
<a href="${breadCrumb.Href}">${breadCrumb.Name}</a>
<%
addSlash = true
end
%>
</div>
Spark:
<div>
<var addSlash="false" type="bool">
<for each='var breadCrumb in (List[[BreadCrumb]])PropertyBag["BreadCrumbs"]'>
<span if='addSlash == true'>></span>
<a href='${breadCrumb.Href}'>${breadCrumb.Name}</a>
# addSlash = true;
</for>
</var>
Partial Pages:
In Brail, the way we were using partial pages was to specify the partials as “layouts” after the main layout on our controller:
[Layout("Main", "myPartialPage")]
public class HomeController : SmartDispatcherController

{

// ...

}
and in the Main layout, you specify where the view content is rendered like so:
<div>
${ChildOutput}
</div>
This doesn’t work in Spark. If you provide a second layout parameter to the Layout attribute on your controller, Spark will use that for the view content. So to fix this, we have to remove the second Layout attribute parameter:
[Layout("Main")]
public class HomeController : SmartDispatcherController

{

// ...

}
and then adjust our HTML to have the <use /> tag instead (I think this is cleaner)
<div>
<use file="myPartialPage" />
<use content="view" />
</div>
Other things:
Brail has a handy ${SiteRoot} variable added to the view context, which will give you the root path of the site for things like including scripts and css. With Spark, you can also use ${SiteRoot}, you just have to setup a couple of things first:
[Layout("Main")]
public class HomeController : SmartDispatcherController
{
public override void Initialize()
{
base.Initialize();
PropertyBag["SiteRoot"] = Context.ApplicationPath;
}
}
and add the viewdata tag at the top of the page:
<viewdata SiteRoot='string' />
now you can reference scripts, urls, css, etc. properly:
<script type="text/javascript" src="${SiteRoot}/Scripts/jquery-1.4.3.min.js"></script>
Strangeness with NUnit runner instantiating attributes before running tests are run
Posted by codereflection in Development on September 14, 2011
So Scott Koon and I going through converting a project from using MBUnit / Gallio to NUnit instead, mainly for the speed benefits, but also for complying with the direction of our development moving forward. One gotcha we just ran into is in the way NUnit handles custom attributes.
Say you have an attribute like this:
    [AttributeUsage(AttributeTargets.Class, AllowMultiple = false)]
    public class DogMeowsLikeRatAttribute : Attribute
    {
        public DogMeowsLikeRatAttribute()
        {
            if (!StateMaintainer.HasBeenTouched)
                throw new ImmaCryException("Oh snap! You broke it!");
        }
    }
and a class that uses the attribute:
    [DogMeowsLikeRat]
    public class WhatDoWeAttributeThisTooClass
    {
        public void FoShizzel()
        {
            Console.WriteLine("Nizzle izzle da bomb dapibizzle turpizzle go to hizzle shiz");
        }
    }
and a test for your class
    [TestFixture]
    public class TestThatClassyClass
    {
        [Test]
        public void WhoaNow()
        {
            StateMaintainer.HasBeenTouched = true;

            var subject = new WhatDoWeAttributeThisTooClass();
            subject.Should().NotBeNull("Cause I said so!");
        }
    }
and the state maintainer just to prove the point:
    public static class StateMaintainer
    {
        public static bool HasBeenTouched;
    }
When you run the test, you will receive an exception. Now the important thing is to look at the stack trace here:
<pre>------ Test started: Assembly: DoesNunitInstantiateAttributes.dll ------

Here's what you're a gonna do: Oh snap! You broke it!
Test 'M:DoesNunitInstantiateAttributes.TestThatClassyClass.WhoaNow' failed: Oh snap! You broke it!
	DoesNunitInstantiateAttributes.ImmaCryException: Oh snap! You broke it!
	Class1.cs(18,0): at DoesNunitInstantiateAttributes.DogMeowsLikeRatAttribute..ctor()
	at System.RuntimeTypeHandle.CreateCaInstance(RuntimeType type, IRuntimeMethodInfo ctor)
	at System.Reflection.CustomAttribute.GetCustomAttributes(RuntimeModule decoratedModule, Int32 decoratedMetadataToken, Int32 pcaCount, RuntimeType attributeFilterType, Boolean mustBeInheritable, IList derivedAttributes, Boolean isDecoratedTargetSecurityTransparent)
	at System.Reflection.CustomAttribute.GetCustomAttributes(RuntimeType type, RuntimeType caType, Boolean inherit)
	at System.RuntimeType.GetCustomAttributes(Boolean inherit)
	at NUnit.Core.Reflect.GetAttributes(ICustomAttributeProvider member, Boolean inherit)
	at NUnit.Core.Reflect.HasAttribute(ICustomAttributeProvider member, String attrName, Boolean inherit)
	at NUnit.Core.Builders.NUnitTestFixtureBuilder.CanBuildFrom(Type type)
	at NUnit.Core.Extensibility.SuiteBuilderCollection.CanBuildFrom(Type type)
	at NUnit.Core.TestFixtureBuilder.CanBuildFrom(Type type)
	at NUnit.Core.Builders.TestAssemblyBuilder.GetFixtures(Assembly assembly, String ns)
	at NUnit.Core.Builders.TestAssemblyBuilder.Build(String assemblyName, Boolean autoSuites)
	at NUnit.Core.Builders.TestAssemblyBuilder.Build(String assemblyName, String testName, Boolean autoSuites)
	at NUnit.Core.TestSuiteBuilder.BuildSingleAssembly(TestPackage package)
	at NUnit.Core.TestSuiteBuilder.Build(TestPackage package)
	at NUnit.AddInRunner.NUnitTestRunner.run(ITestListener testListener, Assembly assembly, ITestFilter filter)
	at NUnit.AddInRunner.NUnitTestRunner.runMethod(ITestListener testListener, Assembly assembly, MethodInfo method)
	at NUnit.AddInRunner.NUnitTestRunner.MemberRun.Run(NUnitTestRunner testRunner, ITestListener testListener, Assembly assembly)
	at NUnit.AddInRunner.NUnitTestRunner.run(ITestListener testListener, Assembly assembly, IRun run)
	at NUnit.AddInRunner.NUnitTestRunner.RunMember(ITestListener testListener, Assembly assembly, MemberInfo member)
	at TestDriven.TestRunner.AdaptorTestRunner.Run(ITestListener testListener, ITraceListener traceListener, String assemblyPath, String testPath)
	at TestDriven.TestRunner.ThreadTestRunner.Runner.Run()

0 passed, 1 failed, 0 skipped, took 0.18 seconds (NUnit 2.5).</pre>
The test where the attributed class is instantiated has not been hit yet by NUnit. Instead, it seems that NUnit is gleaning over the text fixtures in the assembly, finding all of the custom attributes, and instantiating those attributes before running any of the tests. We ran into this issue because of an attribute that had an IoC container lookup (I know what you’re going to say, but we didn’t write it) in the constructor of the attribute. Due to the container not yet being initialized, an exception was thrown.
Hopefully Charlie Poole can provide some insight into this strange behavior on NUnit’s part.
Giles auto test runner for .NET v0.1.1.2 Released
Posted by codereflection in Giles on September 12, 2011
Giles, my pet auto test runner project for .NET applications, has just grown up to v0.1.1.2 and been released on Nuget. Included in this release (and some previous releases) are:
v0.1.1.2 - Sept 12, 2011
 - Added x86 version of Giles to support testing of x86 target applications. A giles-x86.ps1 script has also been included to launch the x86 Giles instead of the AnyCPU version
 - Added Giles version output to help window and to the console window title

v0.1.1.1 - Sept 2, 2011
 - Added giles.ps1 & init script. Now instead of having to run Giles manually from the nuget package, you just need to run giles.ps1 from the root of the solution. Giles will find the correct .sln files and start watching straight away.
 - Added MIT license

v0.1.1.0 - Sept 1, 2011
 - Fixed Machine.Specification versioning issue where the test project needed to have the same version of mspec that Giles was using. Giles no longer has a dependancy on Machine.Specifications.dll, so we're version independent now!

v0.1.0.2 - Aug 29, 2011
 - Introduced Giles own runners instead of relying on console runners for each test framework
 - The only command line option required now is the solution file to watch, the test assembly is determined automatically.  If Giles gets the test assembly incorrect, then you can specify the test assembly location with the -t parameter
Most importantly with v0.1.1.0, through the magic of anonymous types and dynamics in .NET 4, Giles no longer cares which version of Machine.Specifications (mspec) you are running. Check it out!
Also in the latest version, v0.1.1.2, Giles now ships with a good ol’ x86 version for your thunking pleasure.
Please post issues to the issue tracker on github.
Getting the Castle Windsor Quartz.Net Facility logging with your log4net configuration
Posted by codereflection in Development on September 9, 2011
The Castle Windsor Quartz.Net facility is pretty awesome, it making getting Quartz.net up and running a fairly painless process. However, when things go wrong, Quartz.net will be SILENT about it, unless you configure logging correctly. Already having log4net and Castle.Facilities.Logging setup in my project, here’s the awesomeness that my team came up with to get Quartz.net to tell us what’s up:
Step number the 1) Add a reference to Common.Logging v2.0.0.0 and Common.Logging.Log4Net v2.0.0.0
Step number the 2) Add this assembly binding redirect to your app/web.config:
<dependentAssembly>

<assemblyIdentity name="Common.Logging" publicKeyToken="af08829b84f0328e" culture="neutral"/>

<bindingRedirect oldVersion="0.0.0.0-1.2.0.0" newVersion="2.0.0.0"/>

</dependentAssembly>
Step number the 3) Add this section group to the <configSections> in your app/web.config:
</pre>
<sectionGroup name="common">

<section name="logging" type="Common.Logging.ConfigurationSectionHandler, Common.Logging" />

</sectionGroup>
<pre>
Step number the 4) Add this xml block in the <configuration> block, right after <configSections> works good:
</pre>
<common>

<logging>

<factoryAdapter type="Common.Logging.Log4Net.Log4NetLoggerFactoryAdapter, Common.Logging.Log4net">

<arg key="configType" value="FILE-WATCH" />

<arg key="configFile" value="Log4Net.config" />

</factoryAdapter>

</logging>

</common>
<pre>
Step number the last) Profit.
Now, if you mess up your cron schedule, like
<cron-expression>15 0/1 * CAT * ?</cron-expression>
, you’ll get a beautiful error:
<pre>ERROR 03:14:26 Error scheduling jobs: Illegal characters for this position: 'CAT'
System.FormatException: Illegal characters for this position: 'CAT'
   at Quartz.CronExpression.StoreExpressionVals(Int32 pos, String s, Int32 type)
   at Quartz.CronExpression.BuildExpression(String expression)
   at Quartz.CronExpression..ctor(String cronExpression)
   at Quartz.CronTrigger.set_CronExpressionString(String value)
   at Quartz.CronTrigger..ctor(String name, String group, String jobName, String jobGroup, DateTime startTimeUtc, Nullable`1 endTime, String cronExpression)
   at Quartz.Xml.JobSchedulingDataProcessor.ProcessJobs(quartz data)
   at Quartz.Xml.JobSchedulingDataProcessor.ProcessInternal(String xml)
   at Quartz.Xml.JobSchedulingDataProcessor.ProcessFile(String fileName, String systemId)
   at Quartz.Xml.JobSchedulingDataProcessor.ProcessFileAndScheduleJobs(String fileName, String systemId, IScheduler sched, Boolean overwriteExistingJobs)
   at Quartz.Plugin.Xml.JobInitializationPlugin.ProcessFile(JobFile jobFile)
Many thanks to our friend Lane McLaughlin for figuring out this goo… everyone loves a log.

Visual Studio Silverlight 4 Tools and Resharper Beta snafu & forehead slap
Posted by codereflection in Development, Musings on February 5, 2011
While trying to install Silverlight 4 Tools for Visual Studio this morning, I kept getting this crazy error message “Incompatible processes check” “Submit Exception”.

After wasting about 10 minutes searching, and another 20 redownloading the tools and attempting to install again, I came to the realization that “Submit Exception” was in a list of what should be Window Titles.. and sure enough, Resharper Beta threw up, and wanted me to submit an exception:

well I feel stupid.. ![]()
Adding packages to nuget.org
Posted by codereflection in Development, nuget on January 26, 2011
 mmmmm, nuget.
These steps were written from the mindset of adding a package to the nuget gallery on nuget.org that you require and happens to be missing. Anyone can add a package to nuget.org for any project, even if you’re not a project contributor (although that is ideal). At Russell, we use a LOT of open source frameworks. While upgrading a portion of our code today, we decided to use nuget. The first road bump we found was that nuget.org did not have a package for Castle.Services.Transaction. So what’s a open source loving dev gonna do then? Why, submit a package for it of course!
Steps to add a new package to nuget.org (I’m making a lot of assumptions here, such as you know how to work the command prompt):
1) Make sure you have the nuget.exe command line tool. If not, download the latest from here (or the complex site here) and stick it somewhere accessible from your path (I use d:\dev\tools). If you already have nuget.exe, you can run ‘nuget update’ to get the latest version. More details here from David Ebbo
2) Download the released version of the package you want to add, in this example I’m using Castle.Services.Transaction, which I downloaded from http://www.castleproject.org/castle/download.html
3) Create an empty folder for the package, such as Castle.Services.Transaction, then create a subfolder called ‘lib’
4) Drop the binaries inside the lib folder. Since Castle.Services.Transaction has a NET35 and NET40 version, you’ll have multiple folders:

5) Delete ALL dependencies in the lib folder. Castle.Services.Transaction depends on Castle.Core, but you do not want to include these in this package since Nuget handles dependencies for you. The only binaries you want to include will be the binaries specifically for the project.
6) Create the manifest file by running the nuget spec command, with the –a [assembly location]. You’ll want to make sure you’re NOT inside the folder you created for this project. The .nuspec file will be created in your current folder.

7) Open the nuspec manifest and add the missing information. The Castle.Services.Transaction manifest is at the end of this email.
8) Now we get to generate the actual package. Run the nuget pack command, the first parameter is the .nuspec manifest, the –b parameter is the folder you created for the project, and the –o parameter is the output folder for the package. The –v parameter is for verbose output:

9) Login to nuget.org, and click on “Contribute”, then “Add New Package”
10) Upload the .nupkg file that we just generated with nuget pack.

11) Verify the details of the package then click Next:

12) Choose a logo, or just click Finish to use the icon taken from the manifest:

13) Then, hopefully, a successful upload:

14) After a few minutes, you package should show up:

That’s all there is to it. More information on creating packages can be found here: http://nuget.codeplex.com/documentation?title=Creating%20a%20Package and Phil Haack’s post, which is a little more verbose than these simple instructions.
The Castle.Services.Transaction manifest:
<?xml version="1.0"?>
<package xmlns:xsd="http://www.w3.org/2001/XMLSchema" xmlns:xsi="http://www.w3.org/2001/XMLSchema-instance">
 <metadata xmlns="http://schemas.microsoft.com/packaging/2010/07/nuspec.xsd">
 <id>Castle.Services.Transaction</id>
 <version>2.5.0</version>
 <title>Castle.Services.Transaction</title>
 <authors>Castle Project Contributors</authors>
 <owners>Castle Project Contributors</owners>
 <licenseUrl>http://www.apache.org/licenses/LICENSE-2.0.html</licenseUrl>
 <projectUrl>http://www.castleproject.org/services/transaction/</projectUrl>
 <iconUrl>http://www.castleproject.org/images/cp_logo32.png</iconUrl>
 <requireLicenseAcceptance>false</requireLicenseAcceptance>
 <description>Castle.Service.Transaction was inspired by the Java Transaction API (JTA), although it is a simplified version with no support for two phase commit.

Basically there is a transaction manager that is able to create transactions, that are associated with the thread. You can only have one active transaction per thread.

The transaction object only orchestrates the resources enlisted with it. It is up to the resource implementation to provide integration with some external transaction-capable entity, typically a database connection.</description>
 <dependencies>
 <dependency id="Castle.Core" version="2.5.1" />
 </dependencies>
 </metadata>
</package>
Putting Rake & Albacore in your git repo for instant build awesomeness
Posted by codereflection in Development on January 18, 2011
Whilst checking out the latest and greatest from the machine.specifications repo, I noticed that their build setup uses Rake.. nothing really all that special there, I thought, lots of projects use Rake. But taking a closer look, I discovered that the guys got smart and added a small version of Ruby 1.8.6 to their Tools folder, and wrote their build batches in such a way that the repo version of Ruby is used for their build instead of the local version of Ruby (even if Ruby is not installed at all). This is actually quite brilliant. The brilliance lies in not requiring Ruby to be directly installed on the build server, or any developer’s machine.

Everything that is not needed in Ruby has been stripped out (like webrick) to make the size of the Rake folder as small as possible. Let’s take a look at how Rake is invoked through the build.cmd

Simple and elegant. Since Ruby isn’t something native to the Windows world, it’s just a folder structure that you can move around, so putting a copy in the repo makes a lot of sense. There are no strange things to worry about, such as having PowerShell installed if your build scripts using psake. This is perfect for projects running Mono and developers running Linux or Mac.
So rather than pulling the mspec source and duplicating their setup, I created a skeleton project called BuildWithRuby and pushed it out to github with this exact setup. Instead of using Ruby 1.8.6 like mspec, I’ve carved out a small copy of Ruby 1.8.7 with Albacore in the Tools folder. You can run either build.cmd from the Windows command prompt (or PowerShell), or run build.sh from your bash prompt. This example has a small Console application with a specifications project (using mspec no less). The rake script looks like so:

This script will clean, compile assembly info, build, and run specifications for you. Nothing complicated, and very clean. Hopefully this will help some poor soul who’s stuck without the ability to install Ruby on their build server. 🙂
